
# Installing Wings
Wings is the next generation server control plane from Pterodactyl. It has been rebuilt from the ground up using Go and lessons learned from our first Nodejs Daemon.
WARNING
You should only install Wings if you are running Pterodactyl 1.x. Do not install this software for previous versions of Pterodactyl.
# Supported Systems
The following is a list of supported operating systems. Please be aware that this is not an exhaustive list, there is a high probability that you can run the software on other Linux distributions without much effort. You are responsible for determining which packages may be necessary on those systems. There is also a very high probability that new releases of the supported OSes below will work just fine, you are not restricted to only the versions listed below.
| Operating System | Version | Supported | Notes |
|---|---|---|---|
| Ubuntu | 20.04 | ✅ | Documentation written assuming Ubuntu 20.04 as the base OS. |
| 22.04 | ✅ | ||
| 24.04 | ✅ | ||
| RHEL / Rocky Linux / AlmaLinux | 8 | ✅ | |
| 9 | ✅ | ||
| Debian | 11 | ✅ | |
| 12 | ✅ | ||
| 13 | ✅ | ||
| Windows | All | ❌ | This software will not run in Windows environments. |
# System Requirements
To run Wings, you will need a Linux system capable of running Docker containers. Most VPS and almost all dedicated servers should be capable of running Docker, but there are edge cases.
When your provider uses Virtuozzo, OpenVZ (or OVZ), or LXC virtualization, you will most likely be unable to
run Wings. Some providers have made the necessary changes for nested virtualization to support Docker. Ask your provider's support team to make sure. KVM is guaranteed to work.
The easiest way to check is to type systemd-detect-virt.
If the result doesn't contain OpenVZ orLXC, it should be fine. The result of none will appear when running dedicated hardware without any virtualization.
Should that not work for some reason, or you're still unsure, you can also run the command below.
dane@pterodactyl:~$ sudo dmidecode -s system-manufacturer
VMware, Inc.
# Dependencies
- curl
- Docker
# Installing Docker
For a quick install of Docker CE, you can execute the command below:
curl -sSL https://get.docker.com/ | CHANNEL=stable bash
If you would rather do a manual installation, please reference the official Docker documentation (opens new window) for how to install Docker CE on your server.
Check your Kernel
Please be aware that some hosts install a modified kernel that does not support important docker features. Please
check your kernel by running uname -r. If your kernel ends in -xxxx-grs-ipv6-64 or -xxxx-mod-std-ipv6-64 you're
probably using a non-supported kernel. Check our Kernel Modifications guide for details.
# Start Docker on Boot
If you are on an operating system with systemd (Ubuntu 16+, Debian 8+, CentOS 7+) run the command below to have Docker start when you boot your machine.
sudo systemctl enable --now docker
# Enabling Swap
Recent Linux kernel
Since the version 6.1 of the Linux kernel, swap is enabled by default. If you are running a kernel version 6.1 or newer, you can skip this step. To check your kernel version, run uname -r.
On most systems, Docker will be unable to setup swap space by default. You can confirm this by running docker info and looking for the output of WARNING: No swap limit support near the bottom.
Enabling swap is entirely optional, but we recommended doing it if you will be hosting for others and to prevent OOM errors.
To enable swap, open /etc/default/grub as a root user and find the line starting with GRUB_CMDLINE_LINUX_DEFAULT. Make
sure the line includes swapaccount=1 somewhere inside the double-quotes.
After that, run sudo update-grub followed by sudo reboot to restart the server and have swap enabled.
Below is an example of what the line should look like, do not copy this line verbatim. It often has additional OS-specific parameters.
GRUB_CMDLINE_LINUX_DEFAULT="swapaccount=1"
GRUB Configuration
Some Linux distros may ignore GRUB_CMDLINE_LINUX_DEFAULT. Therefore you might have to use GRUB_CMDLINE_LINUX instead should the default one not work for you.
# Installing Wings
The first step for installing Wings is to ensure we have the required directory structure setup. To do so, run the commands below, which will create the base directory and download the wings executable.
sudo mkdir -p /etc/pterodactyl
curl -L -o /usr/local/bin/wings "https://github.com/pterodactyl/wings/releases/latest/download/wings_linux_$([[ "$(uname -m)" == "x86_64" ]] && echo "amd64" || echo "arm64")"
sudo chmod u+x /usr/local/bin/wings
OVH/SYS Servers
If you are using a server provided by OVH or SoYouStart please be aware that your main drive space is probably allocated to
/home, and not / by default. Please consider using /home/daemon-data for server data. This can be easily
set when creating the node.
# Configure
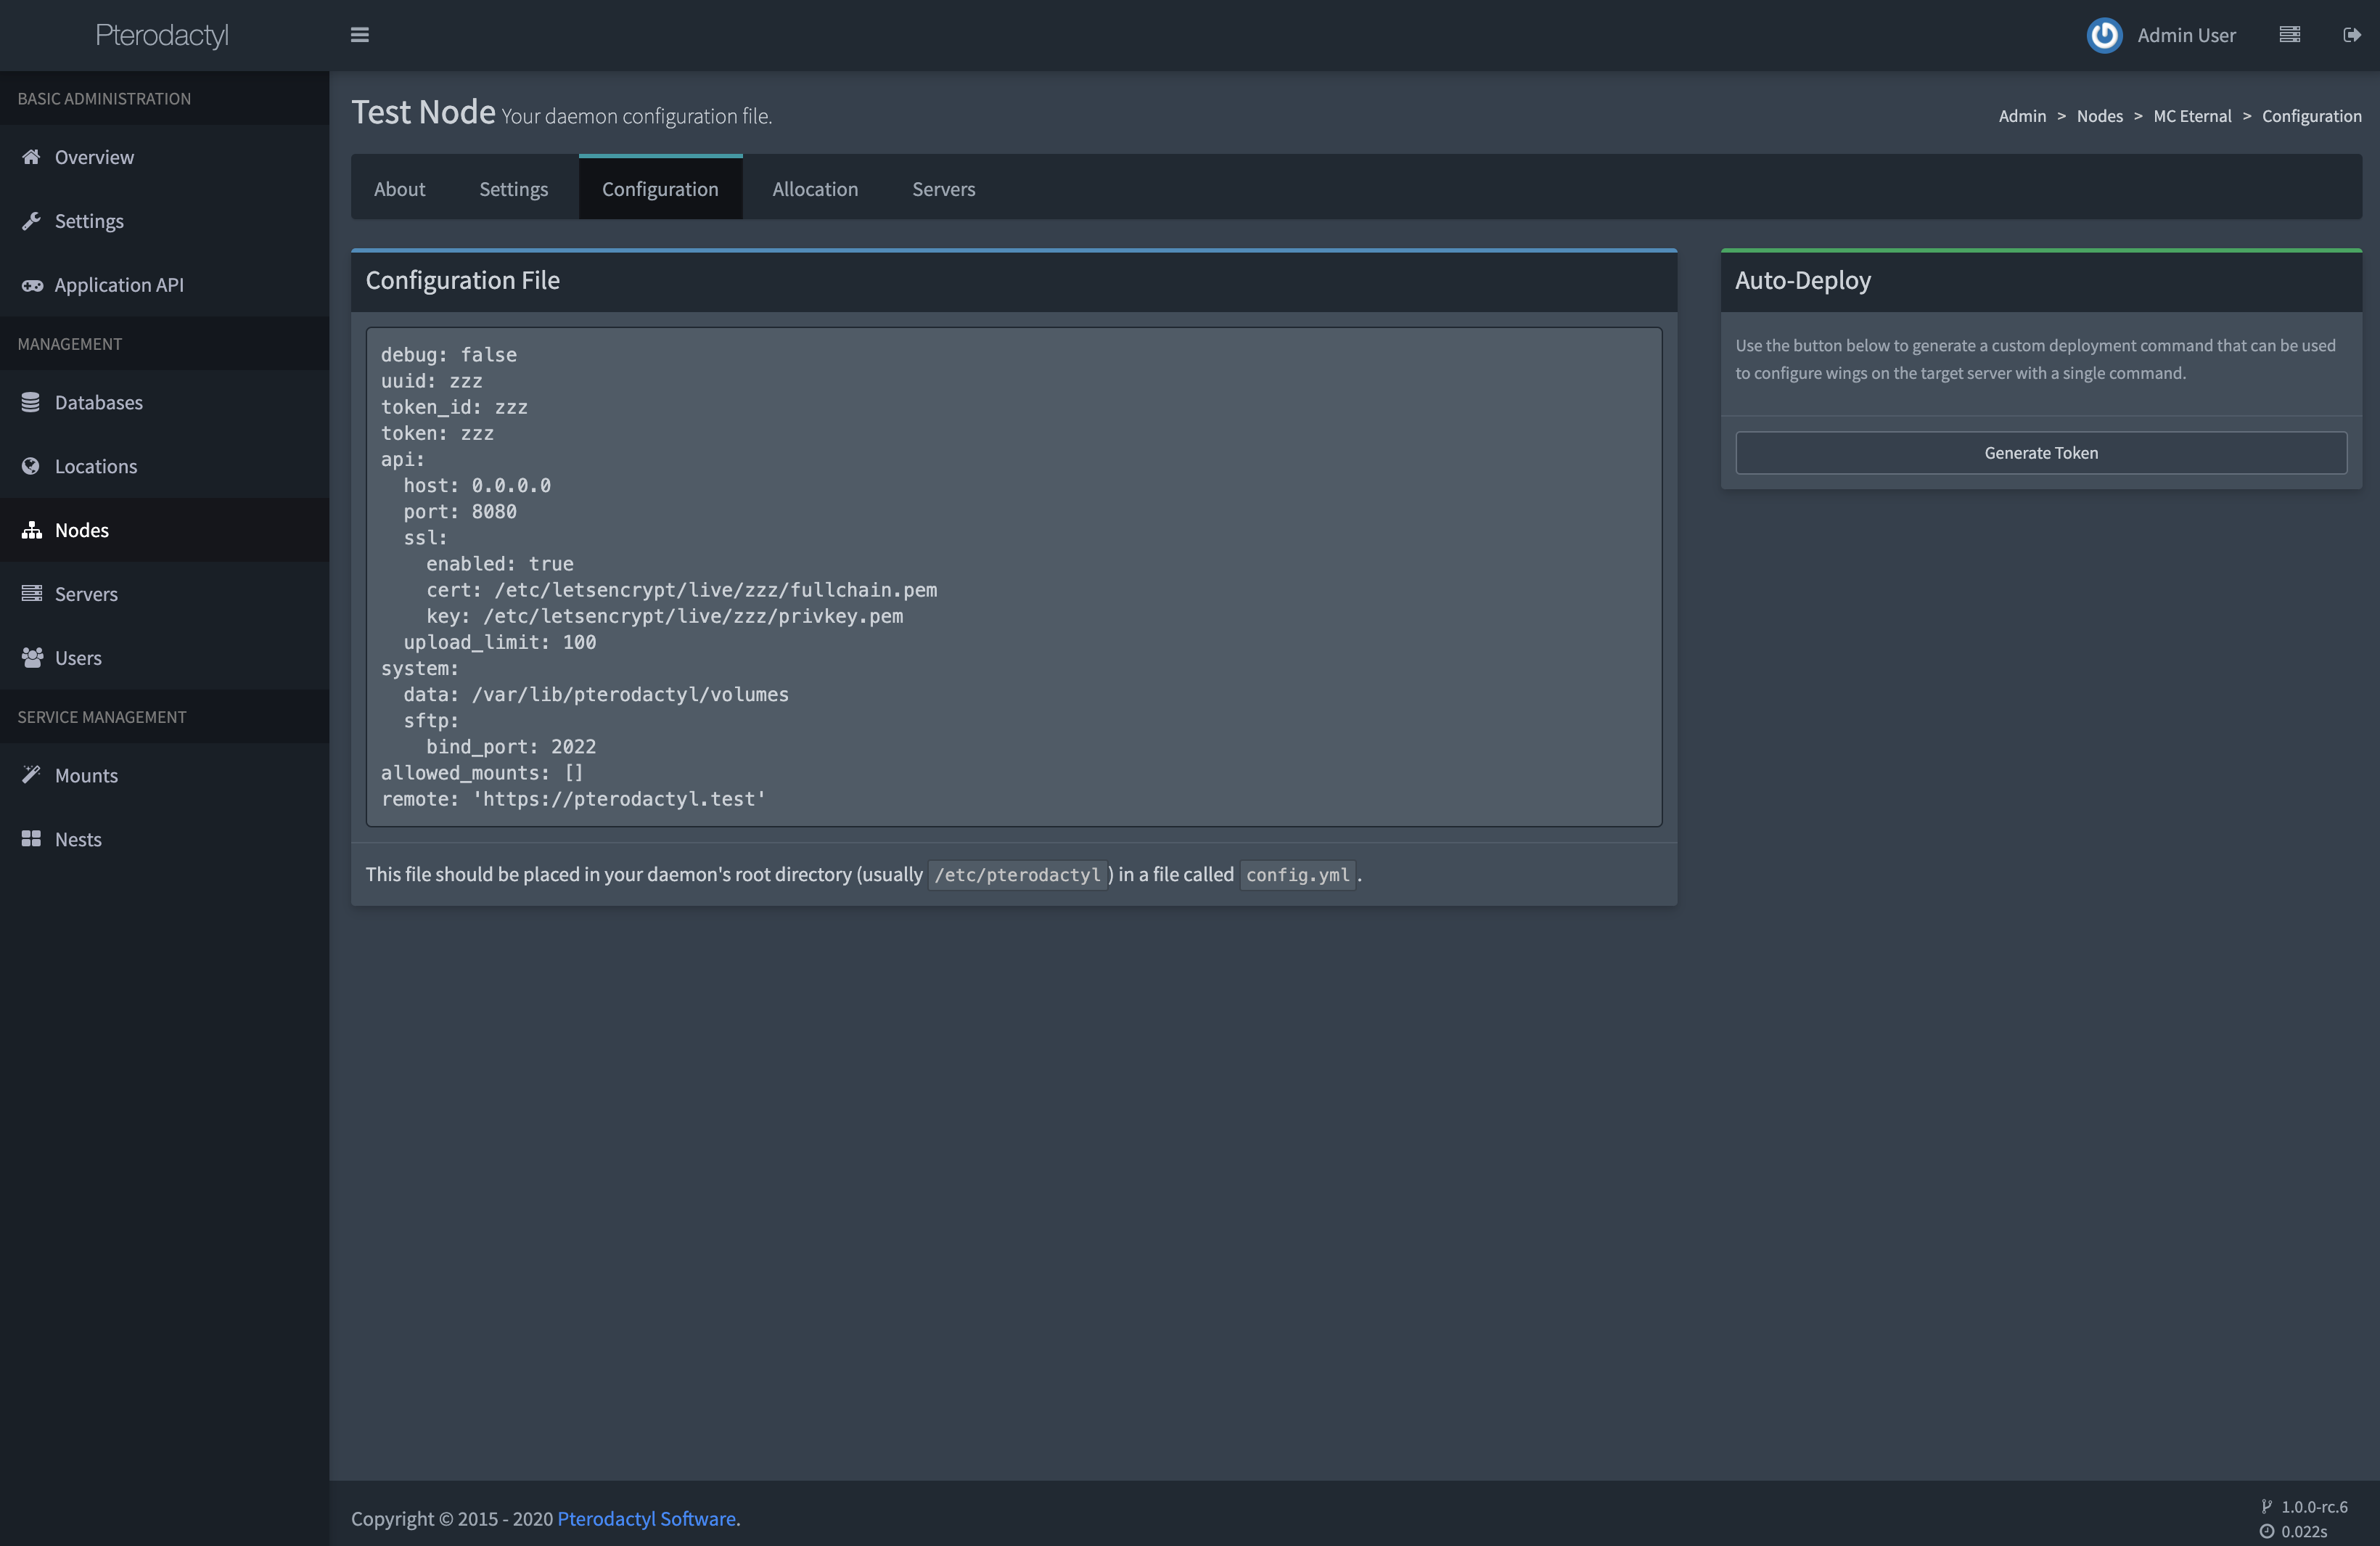
Once you have installed Wings and the required components, the next step is to create a node on your installed Panel. Go to your Panel administrative view, select Nodes from the sidebar, and on the right side click Create New button.
After you have created a node, click on it and there will be a tab called Configuration. Copy the code block content, paste it into a new file called config.yml in /etc/pterodactyl and save it.
Alternatively, you can click on the Generate Token button, copy the bash command and paste it into your terminal.
WARNING
When your Panel is using SSL, the Wings must also have one created for its FQDN. See Creating SSL Certificates documentation page for how to create these certificates before continuing.
# Starting Wings
To start Wings, simply run the command below, which will start it in a debug mode. Once you confirmed that it is running without errors, use CTRL+C to terminate the process and daemonize it by following the instructions below. Depending on your server's internet connection pulling and starting Wings for the first time may take a few minutes.
sudo wings --debug
You may optionally add the --debug flag to run Wings in debug mode.
# Daemonizing (using systemd)
Running Wings in the background is a simple task, just make sure that it runs without errors before doing
this. Place the contents below in a file called wings.service in the /etc/systemd/system directory.
[Unit]
Description=Pterodactyl Wings Daemon
After=docker.service
Requires=docker.service
PartOf=docker.service

[Service]
User=root
WorkingDirectory=/etc/pterodactyl
LimitNOFILE=4096
PIDFile=/var/run/wings/daemon.pid
ExecStart=/usr/local/bin/wings
Restart=on-failure
StartLimitInterval=180
StartLimitBurst=30
RestartSec=5s

[Install]
WantedBy=multi-user.target
Then, run the commands below to reload systemd and start Wings.
sudo systemctl enable --now wings
# Node Allocations
Allocation is a combination of IP and Port that you can assign to a server. Each created server must have at least one allocation. The allocation would be the IP address of your network interface. In some cases, such as when behind NAT, it would be the internal IP. To create new allocations go to Nodes > your node > Allocation.
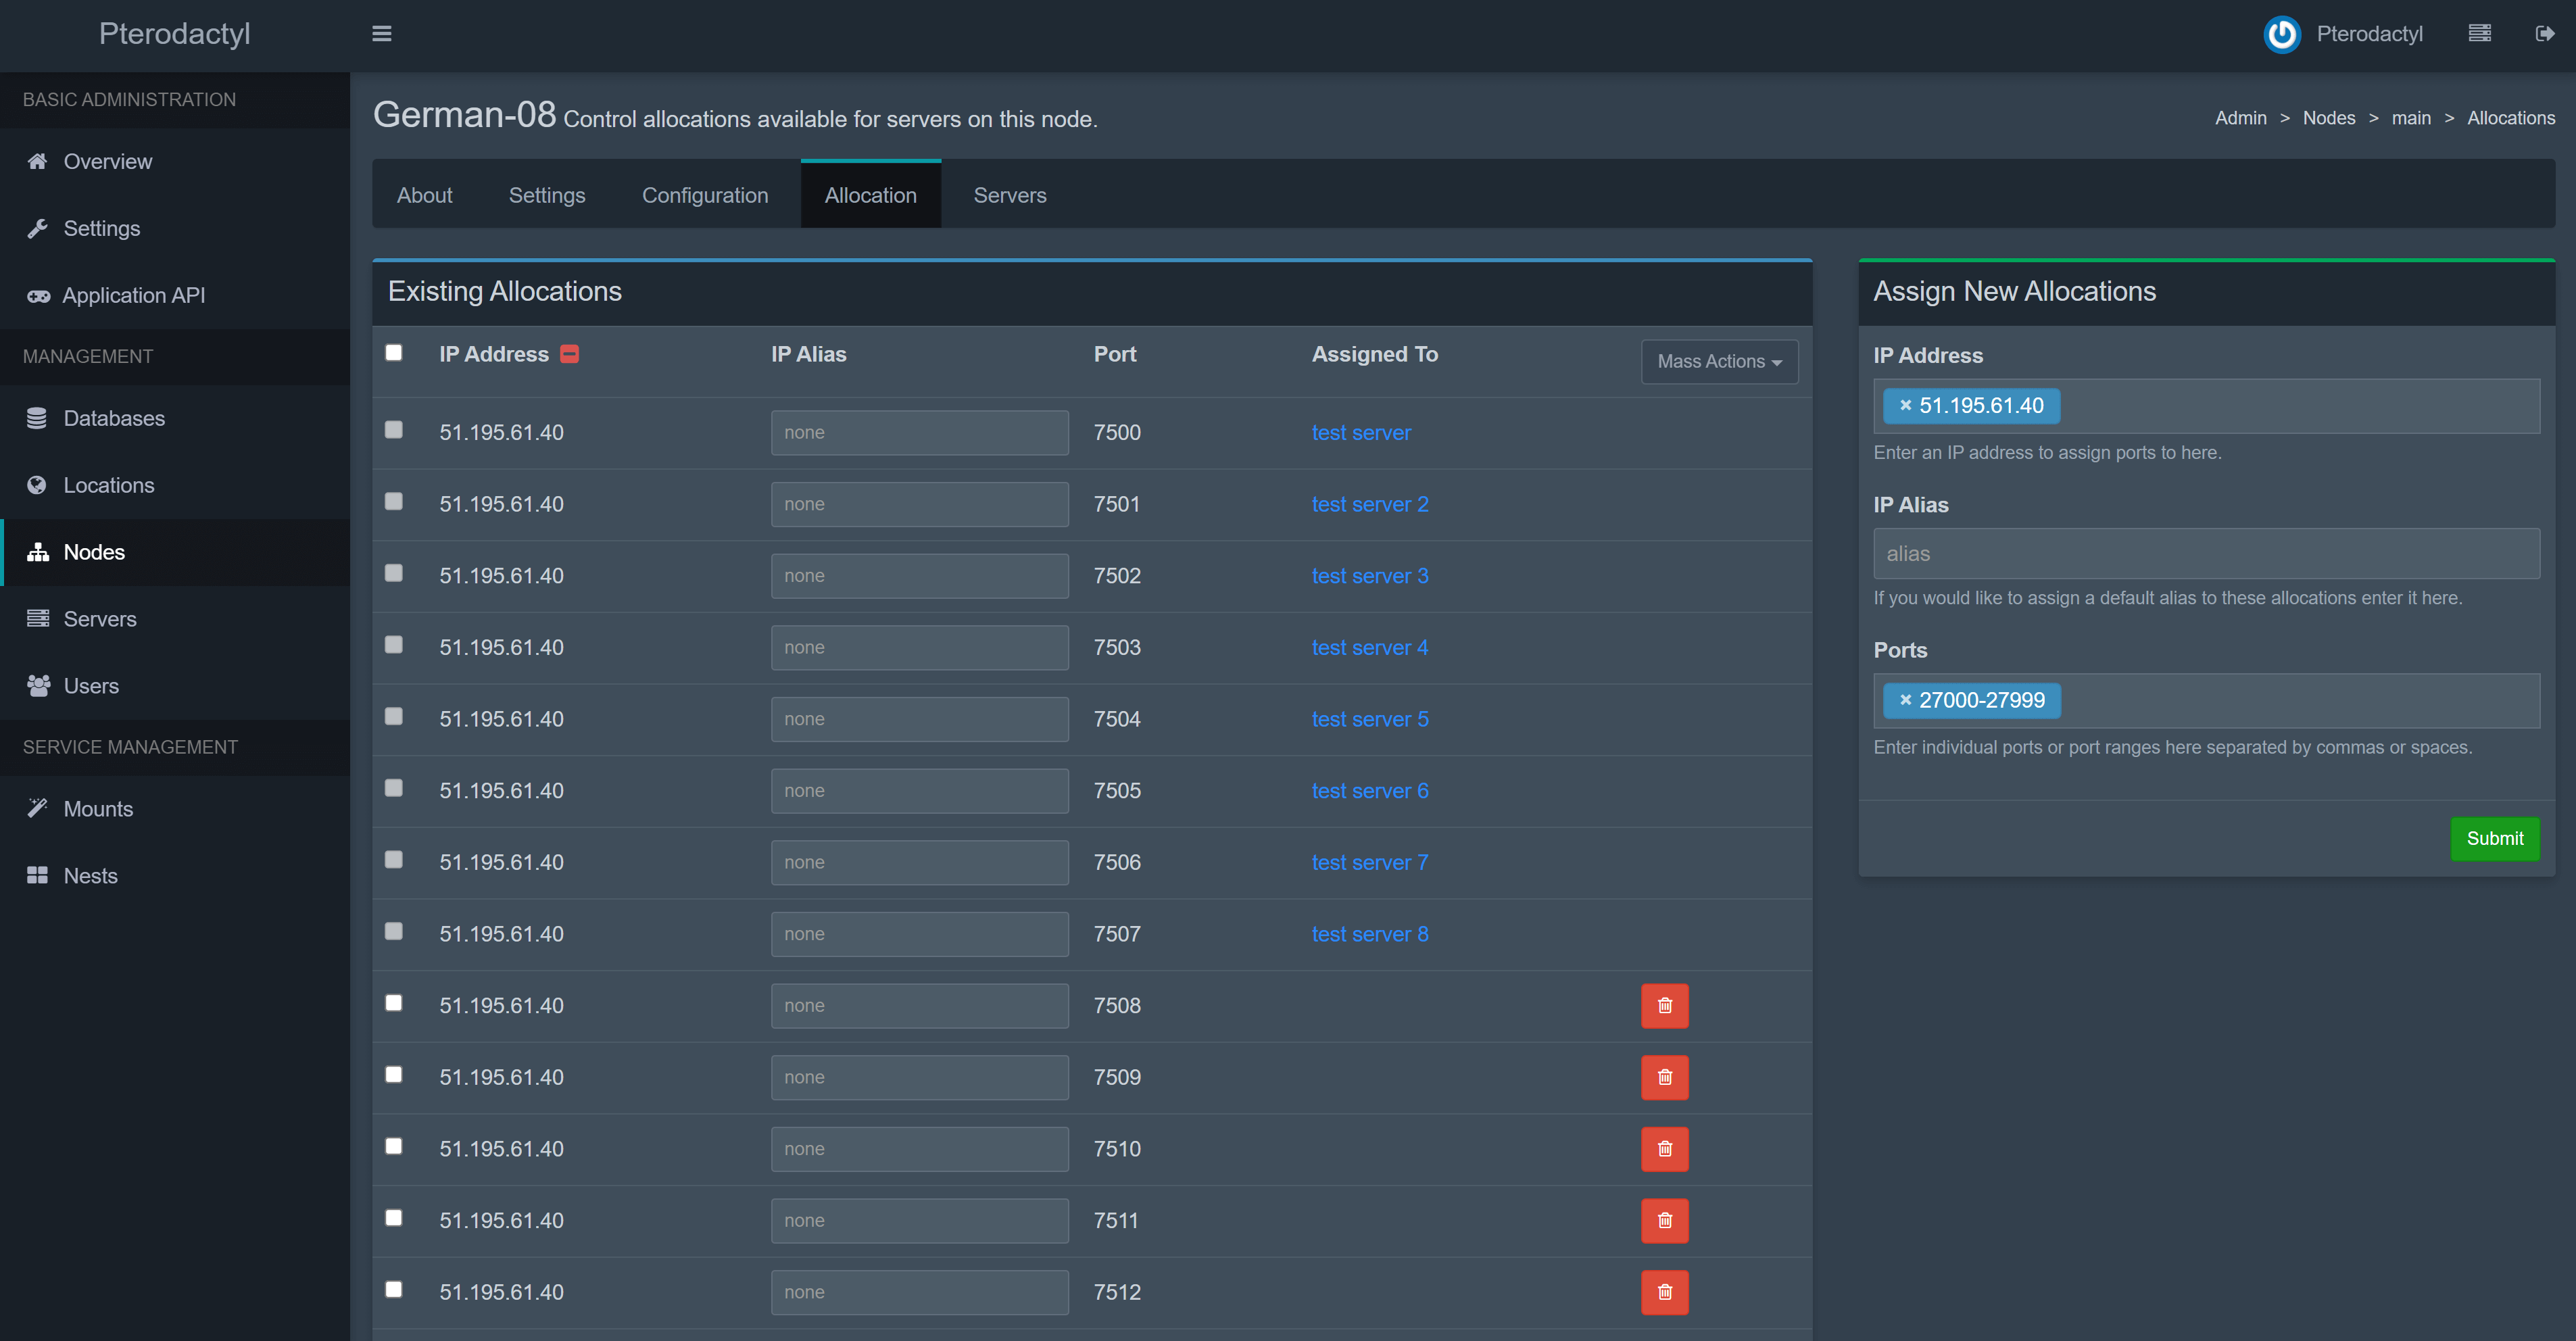
Type hostname -I | awk '{print $1}' to find the IP to be used for the allocation. Alternatively, you can type ip addr | grep "inet " to see all your available interfaces and IP addresses. Do not use 127.0.0.1 for allocations.